Top Tips for Digging a Trampoline into the Ground

Top Tips for Installing an In-ground Trampoline
Installing an in-ground trampoline is easier than ever, but a bit of careful research and planning will help make your project a great success and you'll have problem-free trampolining for years to come.
If you do nothing else, make sure you get the following right & avoid the pitfalls that some customers make:
1. Ensure you have a suitable site
You should carefully check the following:
- You don't have a high water table - this can be done by digging a trial hole about 3ft deep and waiting 24 hours to see if it fills up. Also installing an in-ground trampoline in an area prone to flooding or lying water is not a great idea!
- You don't have any water, drainage, gas or electric cables running close to the surface where you want to site the trampoline. I've seen them all and this has even caused one customer to abandon their project entirely at huge expense.
- You have sufficient run-off space (preferably 2 metres) around the trampoline before coming to anything hazardous such as fences and walls. Kids use in-ground trampolines differently to normal trampolines and you need as much space as possible around the trampoline to get as much benefit as possible.
2. Get the right size & specification of trampoline

Capital In-ground Trampoline
The cost of upgrading to a good specification trampoline is not that much in relation to the overall cost of your project. I would recommend using a trampoline with 8.5 inch springs for a higher user weight limit and a longer life for the trampoline.
A good jump mat e.g. the new armourweave jump mat used on the Capital in-ground trampoline will help the appearance of the trampoline and it will last longer.
You should also look to buy as large a trampoline as possible - kids grow up quickly and of course lots of friends will use the trampoline.
3. Use vented pads trampoline pads

Trampolines Down Under vented Trampoline Pads
Vented pads, such as the TDU vented pads, allow trapped air to escape from under the trampoline. These are essential for two reasons:
- As you bounce on the trampoline air gets forced down and without vented pads has nowhere to go, so the air gets compressed and this detracts from a good quality bounce. Younger children may not notice the inferior bounce, but adults and children certainly will.
- With no vented pads, the trapped air is forced up through the springs and under the pads which then lift and slap back down onto the jump mat making a loud and irritating noise.
4. Use a safe retaining wall system
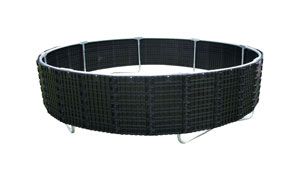
Trampolines Down Under Retaining Wall
Don't fall into the trap of thinking you have firm enough soil that the earth around the trampoline won't fall into the hole you've dug. In the English climate I'm afraid it will! This can be dangerous and unsightly.
You're best to use a purpose-built trampoline retaining wall (e.g. the Trampolines Down Under wall system) or one that's integrated into the design of the trampoline (e.g. the Capital In-ground Trampoline kits).
Breeze blocks or upright wooden sleepers can be used but this often leaves a dangerous and unsightly gap between the edge of the trampoline and the wall.
5. Don't under-estimate the amount of soil that needs to be removed
Many people think that they can lose their dug-out soil in their gardens e.g. in flower beds, in borders, behind sheds. Soil expands as much as 3 times when taken out of the ground and there's a surprising amount of earth that comes out of a trampoline hole.
If you're using a skip then for most trampolines you'll need to hire a medium-sized (8 yard or 10 yard skip) to remove all the soil.
6. Ensure you have adequate drainage
The problem of water collecting in the hole and creating a pond cannot be ignored but really isn't as big an issue as is often made out. If you have porous, sandy soil, then you probably won't need any drainage.
If you're in any doubt, then it's best as a minimum, to put in a soak-away at the bottom of the hole. If you're really concerned, then ask a drainage expert.
Drainage can be sorted out after the trampoline has been installed. All you'll need to do is take the jump mat off (10 minutes work) to access the hole again. So my advice is to use some common sense, don't spend a fortune on drainage upfront. inspect the hole after it's rained a lot.